Labels

Showing posts with label Ubuntu. Show all posts

Friday, March 29, 2013

Install Deepin Music Player on Ubuntu 12.04(2014.03.30 update)

I have only tested the 64 bit version on Ubuntu 12.04.

Download packages

  1. UI library: deepin-ui

    32bit & 64bit:
    http://packages.linuxdeepin.com/deepin/pool/main/d/deepin-ui/deepin-ui_1%2bgit20140325085729~1db408f84b_all.deb
  2. Patched Deepin python-gtk2 to prevent memory leak 

    64bit:
    http://mirrors.ustc.edu.cn/deepin/pool/main/p/pygtk/python-gtk2_2.24.0-3deepin2.1_amd64.deb

    32bit:
    http://mirrors.ustc.edu.cn/deepin/pool/main/p/pygtk/python-gtk2_2.24.0-3deepin2.1_i386.deb
  3. python-deepin-gsettings

    there is a newer version, but don't work with me.

    64bit: 
    http://packages.linuxdeepin.com/deepin/pool/main/d/deepin-gsettings/python-deepin-gsettings_0.1%2bgit20130318115600_amd64.deb

    32bit
    http://packages.linuxdeepin.com/deepin/pool/main/d/deepin-gsettings/python-deepin-gsettings_0.1%2bgit20130318115600_i386.deb
  4. Deep music Player

    32 bit & 64 bit:

    http://packages.linuxdeepin.com/deepin/pool/main/d/deepin-music-player/deepin-music-player_1%2bgit20140226145604~3f30b22573_all.deb
  5. python-deepin-utils 

    64bit:
     http://mirrors.ustc.edu.cn/deepin/pool/main/d/deepin-utils/python-deepin-utils_0.0.1-1%2bgit20131213163147~b0fcaedd21_amd64.deb

    32bit:

     http://mirrors.ustc.edu.cn/deepin/pool/main/d/deepin-utils/python-deepin-utils_0.0.1-1%2bgit20131213163147~b0fcaedd21_i386.deb

    Install Dependencies

    copy and paste this command in terminal window, hit enter and enter account password:
    sudo apt-get install libgio2.0-cil-dev python-keybinder python-cddb python-webob python-pyquery python-numpy python-scipy gettext  python-xlib python-mutagen python-chardet python-pycurl gstreamer0.10-ffmpeg gstreamer0.10-plugins-ugly gstreamer0.10-plugins-good gstreamer0.10-plugins-bad gstreamer0.10-plugins-bad-multiverse python-gst0.10

    Installation

    After downloading previous packages, open a terminal, cd to the directory where these .deb files lies in and fire the command:
    sudo dpkg -i deepin*.deb python-*.deb
    
    if there are any unmet dependencies, try
    sudo apt-get -f install
    

    Warn: don't enable global hot key

    I enabled the global hot keys, and the player don't start the second time I run it. If you have done it, edit the following config file:
    vi ~/.config/deepin-music-player/config
    
    change enable = true to enable = false in the globalkey field. save and exit.

    Global hot key now works.

    Integrate with Unity shortcut list

    make a new text file in ~/.local/share/applications, filename is deepin-music-player.desktop. copy the following code into this file.
    [Desktop Entry]
    Version=1.0
    Name=Deepin Music Player
    Comment=Deepin Music Player
    Terminal=false
    X-MultipleArgs=false
    Type=Application
    Icon=deepin-music-player.png
    StartupNotify=true
    X-Ayatana-Desktop-Shortcuts=Next;Previous;Pause/Play;Fast Forward;Fast Backward;
    Exec=deepin-music-player
    
    [Next Shortcut Group]
    Name=Next
    Exec=deepin-music-player --next
    TargetEnvironment=Unity
    
    [Previous Shortcut Group]
    Name=Previous
    Exec=deepin-music-player --prev
    TargetEnvironment=Unity
    
    [Pause/Play Shortcut Group]
    Name=Pause/Play
    Exec=deepin-music-player --play-pause
    TargetEnvironment=Unity
    
    [Fast Forward Shortcut Group]
    Name=Fast Forward
    Exec=deepin-music-player --forward
    TargetEnvironment=Unity
    
    [Fast Backward Shortcut Group]
    Name=Fast Backward
    Exec=deepin-music-player --rewind
    TargetEnvironment=Unity
    

    The result looks like this:
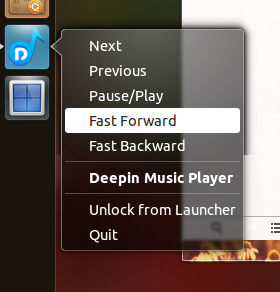

    but the Quit menu doesn't work.

    more screenshots


    Reference

    LinuxDeepin offical blog tutorial.


    Thursday, October 4, 2012

    Ubuntu12.04下配置Goagent翻墙(Goagent+Chrome/Firefox+Proxy SwitchSharp/AutoProxy)

    翻墙对身处墙内的屁民来说是一项基本的生存技能。Goagent支持Windows,Linux,Mac X,Android等平台。是目前翻墙的最佳方案。

    1. 下载安装Goagent
    2. Google一下,很容易找到其项目主页为https://code.google.com/p/goagent/。写作此文时(2012.10.04)最新版本是 goagent 2.0.13 正式版下载 http://goo.gl/sxgfB 。下载后用下面的命令进行解压:
      sudo unzip -d /usr/app/ goagent-goagent-v2.0.13-xxxxxx.zip 
      /usr/app/是我自己建立的文件夹,注意换成你自己的路径,以下出现的/usr/app/也要换成你自己的goagent所在的路径请仔细阅读项目主页上的说明,许多配置问题可以在那里找到答案。

    3. 申请GAE appid
    4. 这一步需要有Google账号。申请地址:https://appengine.google.com/,具体申请过程请自行Google,网上有许多教程,随便挑一个,比如 http://www.baibudu.com/google-app-engine-application-steps/

    5. 配置Goagent(proxy.ini)
    6. 编辑 goagent/local/proxy.ini文件
      sudo vi /usr/app/goagent/local/proxy.ini 
      修改第8行,在appid = 的等于号后面写上上一步申请到的GAE appid,如果申请了多个,用 | 隔开。保存退出。

    7. 上传uploader.zip
    8. cd /usr/app/goagent/server/
      python uploader.zip
      按照提示输入申请appid时使用的Google账户(Gmail邮箱),appid,Gmail账户密码。

    9. 运行goagent代理
    10. python /usr/app/goagent/local/proxy.py
      代理服务器地址:127.0.0.1,端口号:8080 。记下备用。

    11. 设置开机自启动
    12. 点击Ubuntu右上角的设置-startup applications,点击add。command写
      python /usr/app/goagent/local/proxy.py
      如下图所示:

    13. 配置浏览器使用代理自动翻墙
      • Chrome 22
      • Chrome可以使用Proxy SwitchySharp这个Extension实现自动翻墙,在Chrome Web Store里搜索下载这个Extension。

        1. 设置Proxy Profiles,填写代理服务器的信息。如下图:
        2. 设置代理规则实现根据网址自动切换代理。
        3. 勾选On line Rule List,订阅这个列表:
          https://autoproxy-gfwlist.googlecode.com/svn/trunk/gfwlist.txt
          在这个列表中的网址都将使用Goagent,其他网址不使用代理。

        4. 证书问题(访问facebook, twitter, G+等https开头的网址)
        5. Linux下目前可用的方法是使用certutil命令导入goagent提供的CA.crt证书。
          1. 安装libnss3-tools
          2. sudo apt-get install libnss3-tools
          3. 导入证书
          4. certutil -d sql:$HOME/.pki/nssdb -A -t 'C,,' -n goagent -i /usr/app/goagent/local/CA.crt

      • Firefox 15.0.1
      • Firefox我在使用的插件是AutoProxy,设置方法与Chrome下的Proxy SwitchySharp大同小异。
        要订阅gfwList(P.R.China)这个列表,以实现根据网址决定是否翻墙。
        导入证书,访问facebook、twitter等https网址
    Edit->Preferences->Advanced->Encryption->View Certificates->Authorities->Import,导入/usr/app/goagent/local/CA.crt这个文件。

    Friday, September 28, 2012

    LaTeX中文书签乱码解决办法(Ubuntu, texlive)

    中文乱码一直是个非常头疼的问题,今天用LaTeX写一份作业,遇到了pdflatex生成的书签乱码的问题。Google了许久,无解。只在这儿看到了一个启发性的帖子。帖子里提到
    The `CJKbookmarks' option should only be used for bookmarks *not* in Unicode.
    由于Linux全系统默认Unicode(UTF8),所以根本不需要特殊的设置。如果.tex文件使用的是utf8编码,那么输出的pdf文件本就应该是正常的。因此我移除了hyperref选项中的CJKbookmarks=true选项并加上unicode选项,再用pdflatex编译,果然就正常了。模板如下,%后面是被注释掉的内容。
    \documentclass[a4paper,12pt]{article}
    \usepackage[%CJKbookmarks=true,
     colorlinks,
     linkcolor=black,
     anchorcolor=blue, 
     citecolor=green,
     unicode=true,
    ]{hyperref}
    %由于作者和标题也含有中文,而此时还未加载中文宏包,所以不能使用中文。   
    \usepackage[UTF8]{ctex}
    \usepackage{CJKpunct}
    \usepackage{indentfirst} 
    \usepackage{fancyhdr}
    \usepackage{amsmath}
    \usepackage[hmargin = {2.54cm}, vmargin = {3.17cm}]{geometry}
    \usepackage{titlesec}
    %\usepackage{CJKutf8}
    
    
    \hypersetup{pdfauthor={某某}, pdftitle={数学建模第一次实验}}
     要点:

    1. 中文宏包与hyperref宏包的加载顺序是重要的,以前在Windows下使用CTeX的时候就发现了这个问题。
    2. 在Linux里全局要使用UTF8编码,不要为了个别乱码听从网上的一些教程改系统locale,遇到乱码问题,尽量坚持使用UTF8编码。在整个系统全程使用一种编码(UTF8),既与国际接轨(好大的词儿),又可避免许多问题。Unicode是以后的趋势。
    3. 新建的tex源文件要使用UTF8编码,在编译器的选项里进行设置。
    我的系统环境:
    Ubuntu 12.04 LTS,Texlive 2012,Texworks和Texmaker,使用pdflatex生成pdf。

    Sunday, September 23, 2012

    Ubuntu Linux rar,zip压缩文件中文文件名乱码


    从Windows平台传来的RAR和ZIP文件中的中文文件名采用的是GBK(网上这么说的)编码,而Ubuntu默认全系统采用UTF8编码,这就是各种乱码问题的根源。从这一点上说,Windows实在是可恶。Windows不同语言采用不同的本地化编码给国际化造成了非常大的不便,网上关于中文在Linux下乱码的求助帖子一搜搜到一大把。博主也常常把解决乱码作为博客内容。我想把各种乱码问题都汇聚起来,供后来者参考。这是第一篇。

    1. RAR文件乱码
    2. 这里说的乱码是指压缩包内的中文文件名乱码,如果是rar文件本身是乱码,请看下面的转换文件名的编码。如果安装了系统提供的比较旧的rar和unrar,首先缷载。命令为
      sudo apt-get remove rar unrar
      然后到WinRAR 的官方网站下载最新版,最新版的RAR已经解决了中文乱码的问题。地址:
      RAR 4.20 for LinuxCommand line onlyTrial916 KB
      RAR 4.20 for Linux x64Command line onlyTrial956 KB

      根据系统情况选择对应的版本。下载后cd到下载的文件所在目录。用下面的命令解压文件。
      tar xf rarlinux-*4.2.0.tar.gz 
      cd 到解压产生的文件夹,运行命令
      make
      完成安装。现在就可以正常解压RAR文件了。如
      unrar x 文件名.rar

    3. ZIP文件乱码
    4. zip文件乱码我还没找到一个一步完成的解决办法。现在得分两步走,先解压,再转文件编码:

      • 第一步 解压
      • 安装p7zip。Ubuntu软件中心里有这个软件,也可以命令行安装
        sudo apt-get install p7zip-full 
        依我看用我的方法未必需要full安装,只安装p7zip应该也可以,我电脑上已经full安装了,就不测试了。读者可以试一试。 现在打开zip文件还是乱码的。 (突然意识到不需要第一步的,直接第二步不就行了。。。。既然写了,先放在这儿吧)

      • 第二步 转换文件名编码
      • 看下一节。。。。


  6. 转换文件名的编码

  7. 首先、安装 convmv
    sudo apt-get install convmv
    然后cd到有乱码文件的文件夹
    convmv -f GBK -t UTF-8  --notest  *.mp3
    convmv 会判断文件是不是UTF-8编码,如果已经是了,会自动跳过。所以不用担心正常的文件会被转成乱码。(这一点很有用,在解决mp3标签乱码的时候网上推荐最多的工具不自动判断,结果把我许多原本正常的文件转成筹码了,没处说去啊当了小白鼠了,改天把那个方法也写下来,免得更多人和我一样。)

    Saturday, September 22, 2012

    Ubuntu 12.04 Texlive2012 中文支持

    找的好辛苦~~~~终于找到了一个解决办法,而且是从我们学校一个学长的博客那里看来的。还是好一点的学校出来的人靠谱一点~~~~
    最初出处:http://astroman.lamost.org/dbs/archives/10296

    虽然这是一个傻瓜式教程,阅读本文你还是需要大致的了解:kile,latex。如不了解请自行google,不多作介绍。
    (楼主注:kile不是必需的,只是用来写LaTeX源文件,可以使用任何编辑器,楼主使用的是自定义安装的Texlive 2012)
    linux下自行安装的kile不支持中文,当然,一般用kile写专业学术论文也用不着中文。但身在国内是无论如何都不可避免的要接触到中文的,好吧,废话少说,下面教你实现中文。
    大致走以下几步:

    1. 安装TexLive
    2. sudo apt-get install texlive texlive-math-extra texlive-latex-base texlive-latex-extra texlive-latex-recommended texlive-pictures texlive-science texlive-bibtex-extra texlive-common latex-beamer(install后面的内容不是固定的,可根据需要安装你所需要的包)

    3. 安装CJK相关软件包
    4. sudo apt-get install latex-cjk-chinese ttf-arphic-* hbf-*(或者sudo apt-get install latex-cjk-all本文只说安装中文,这个命令足够了)

    5. 配置字体
    6. 当时我按网上提供的配置方法没走的通,不是方法的问题,是我没完全理解如何配置,在这我提供一个比较简单的方法,很快就可以搞定,点击下载nsungt1-1.4.2.tar.gz,解压后在终端运行 ./install.sh即可。 学长提供了另一个下载地址:http://ftp.twaren.net/local-distfiles/tex/cjk/fonts/nsungt1/ 

    7. 最后一步
    8. sudo vim /var/lib/texmf/web2c/updmap.cfg
      在最后一行输入:
      Map cjk.map
      保存退出

    实例测试:

    打开kile—new file —emperty document,输入:
    \documentclass{article}
    \usepackage{CJKutf8}
    \begin{document}
    \begin{CJK}{UTF8}{nsung}
      你好,中国!  
    \end{CJK}
    \end{document}
    
    用latex或者pdflatex 编译也可以,kile不是必要的。